Showing posts with label OS X. Show all posts

Thursday, September 20, 2012

Virtualization & The Mind

In previous posts published Apr. 7 and Nov. 25, 2009, I discussed the use of QEMU for emulating virtual computers and the use VirtualBox to run Google's Chrome OS on an Apple MacIntosh Mini computer, respectively. This post provides more detail on the installation of guest operating systems on two platforms using VirtualBox. VirtualBox is an emulation application originally developed at Sun Microsystems and now supported by Oracle. It permits us to operate a guest operating system (OS) on virtual computers installed on a different platform. Two configurations are discussed (see table below).

Configuration Host Computer Host OS Guest OS
1 Apple MacBook 10.6 Windows 8
2 Dell Inspiron Windows 7 Linux


The two test configurations (table courtesy: HTML Tables).

One configuration entails running a Linux-operated virtual computer on a Microsoft Corporation's Windows 7 (32-bit) operated Dell Inspiron 1318 laptop (2.00 GHz Intel Core 2 Duo; 2 GB RAM). In the other, a Microsoft Windows 8 (64-bit) operated virtual computer is run on a OS X (10.6.8) operated Apple MacBook (2.26 GHz Intel Core 2 Duo; 2 GB RAM). In both examples, the results have been excellent. The virtual guest machines operate astoundingly fast, while the impact on the host computers performance is acceptably small. Below, find suggestions how to proceed with the installation:
  1. Download and install the latest version of the VirtualBox platform package (here 4.2) for each actual computer from Download VirtualBox.
  2. Open the application. The VirtualBox Manager will prompt you to set up a new virtual machine, presenting default options on the right. Set base memory to not more than a third of the host computer's RAM. The base memory can be ramped up to one half of the host computer's RAM. However, this may slow the computer.
  3. Set the virtual machine's video memory to 128 MB.
  4. I chose VMDK as the virtual machine's hard drive format and an 8 GB, expandable, as hard drive size for Linux and 20 GB, fixed, for Windows.
  5. Install guest operating system on the virtual machine. I chose Windows 8 (64 bit) for the OSX-10.6 MacBook host and Crunchbang Linux 10 (32 bit, i-386), a small footprint Ubuntu Linux distribution, for the Windows-7 Inspiron host. You can either install the guest operating systems from disk or iso-images that must be attached to the CD/DVD ROM drive of the virtual machine using 'Devices☞CD/DVD Devices' on VitualBox's pulldown menu.
  6. USB-2.0 support. To enable USB-2.0 devices on the virtual machines, download the Oracle VM VirtualBox Extension Pack for the version matching that of the VirtualBox on your computer from VirtualBox's download page and install the package following conventional host OS-specific procedures.
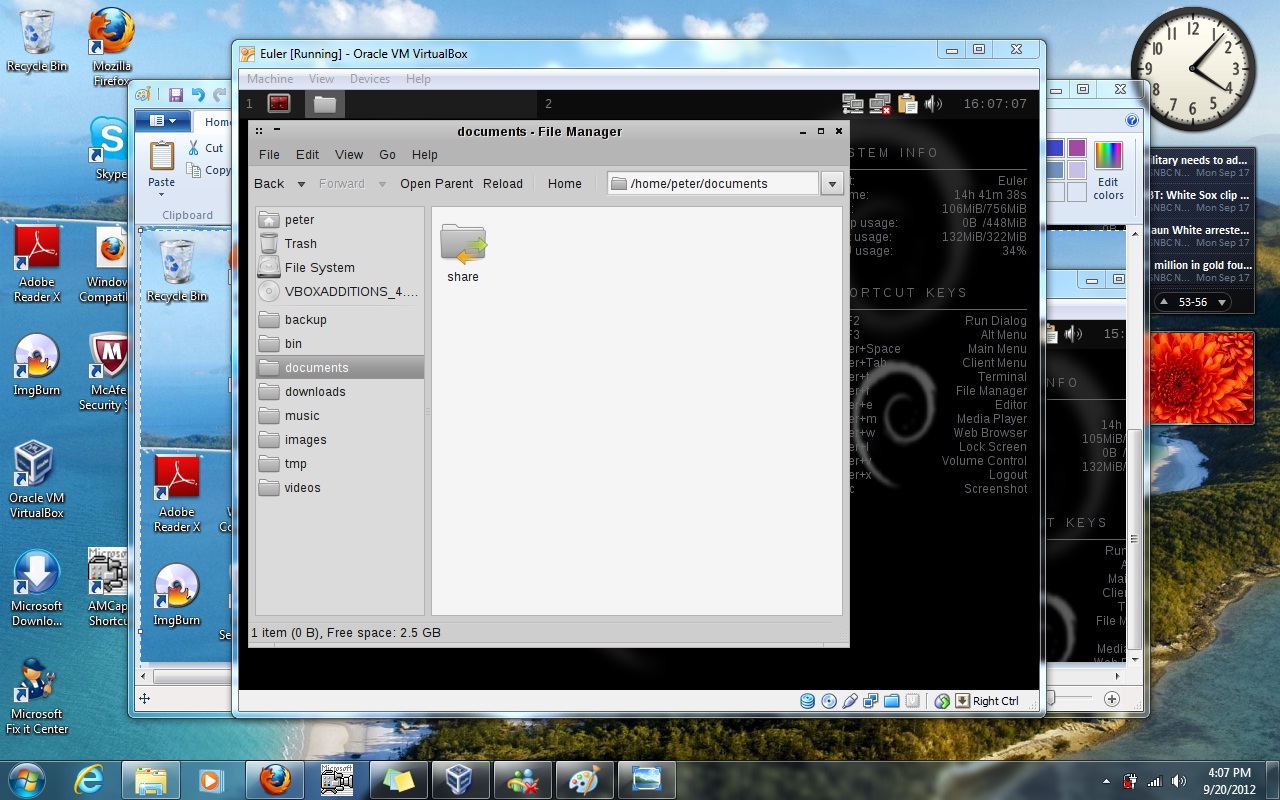
  7. File sharing. To enable file sharing on the virtual machine, VBoxGuestAdditions need to be installed. If you pull down the 'Device' option on the VirtualBox menu and select 'Shared Folders', a VBoxGuestAdditions iso-disk image containing the necessary files should mount. Eventually, the path to the shared folder on the host must be added to the 'shared Folders' list (see details below). If the VBoxGuestAdditions iso-image does not mount, download the image from the VirtualBox repository and mount it on the virtual CD/DVD-ROM drive, using the VirtualBox pulldown menu option 'Devices☞CD/DVD Devices'.
  8. For Windows guests, open the VBoxGuestAdditions iso-disk image folder in the guest with Windows Explorer and simply run the VirtualBox additions executable that matches the guest's operating system. For Linux guests, install the Linux-headers development packages for the kernel of your guest operating system before you proceed. Crunchbang has been developed as a Debian-based Ubuntu distribution. The needed header packages can be added to the operating system with the Synaptic Package Manager. After the packages have been installed, mount the VBoxGuestAdditions iso-image on the virtual CD/DVD-ROM drive, using the VirtualBox pulldown menu option 'Devices☞CD/DVD Devices'and, using the guest's command line terminal, go to the disk image folder, typing at the prompt:

    cd /media/cdrom

    To install the needed additions on the guest enter on the command line:

    sudo sh ./VBoxLinuxAdditions.run

    After providing your root password, the additions should compile and install. Without Linux headers installed, the script attempts to add a pre-compiled module. In my attempts, the module failed to be added on reboot. Hence, I took the alternative route via compilation. The compiler, however, depends on the Linux-headers development packages. Reboot the guest!
  9. The file sharing path for Linux guests. If shutdown and reboot of the guest proceeded without fail, create a folder in your home directory on the Linux guest as mount point for the folder to be shared on the Windows host. On the Windows host, I created a shared file folder with the name 'share' in the Documents folder, and added the folder's path to the list under the VirtualBox pulldown menu option 'Devices☞Shared Folders':

    C:\Users\Username\Documents\share

    If the correct path is inserted, the ok-button will light blue. Press okay. After that, the folder can be mounted on the Linux guest filesystem just so:

    sudo mount -t vboxsf share /home/Username/Documents/share

  10. The file sharing path for Windows guests. For the Windows guest running on a OS X host, make sure that file sharing is activated under 'System Preferences☞Internet & Wireless☞Sharing' on the host. I made a shared folder with the name 'share' in my documents folder on the host and entered its path in the folder list under the VirtualBox pulldown menu option 'Devices☞Shared Folders':

    /Users/Username/Documents/share

    If the correct path is inserted, the ok-button will light blue. Press okay. On the guest, go to 'Windows Explorer☞Networks☞Map network drive,' select a drive, and add under 'Folder':

    \\vboxsvr\share

    Check 'Connect using different credentials', which will present a login window for the host, asking for your username and password. After providing the correct answers, the shared folder on the host should pop up in the guest's Windows Explorer.
Configuration 1: Windows on OS X.

Configuration 2: Linux on Windows.
I have refrained from exploring the Drag-and-Drop option. But in essence, we are all set to go!

Related Posts


Tuesday, November 23, 2010

Kinect on OSX Snow Leopard


Exhilarating Madness!

Microsoft's XB360 Kinect Sensor reached the market the other day to enrich games on the Microsoft Xbox 360 Console with biological motion detection and superb three-dimensional enhancements. Kinect has received good marks to date. The possibility of creating three-dimensional images with Kinect caught my eye yesterday in a post with the title "With Kinect Controller, Hackers Take Liberties" by Jenna Wortham published online in The New York Times Nov. 21, 2010. The potentials are intriguing. Watch Oliver Kreylos' demonstration below:


I decided to give this a try and compile the software driver needed to run the sensor on a MacBook running Snow Leopard (OSX 10.6.5). Sean Nicholls provides useful information in his post with the title "Compiling OpenKinect on a stubborn OSX 10.6.5 (Updated 21/Nov)", first published Nov. 13, 2010. Sean's instructions are straight forward, leading to a functional application that provides as with a simple start. Below I added a few annotations that may be helpful to the novice builder.

In order to obtain the source codes and compile them into binaries, we need to install the packages 'git' (git-1.7.3.2-intel-leopard.dmg) and 'cmake' (cmake-2.8.3-Darwin-universal.dmg), respectively. Both can be downloaded ready for installation from the links Sean provides in his post. Note that third party unix programs traditionally are installed into the directory /usr/local. The header files needed for compiling other packages are installed in the directory /usr/local/include. Compiled executable binaries will be installed in /usr/local/bin. Libraries will be found in /usr/local/lib, and files with information to be shared in /usr/local/share. This is the default map for the directory tree of all installs that conform to GNU conventions.

However, some software designers prefer to have their packages installed into their own directory tree in a separate subdirectory to /usr/local. This is the case with 'git'. We will find the package in /usr/local/git. If we wish to use 'git' commands in a terminal without providing the full path where they are located each time, we must add this path to our environmental PATH variable just so:
  • export PATH="$PATH:/usr/local/git/bin
If we now type:
  • echo $PATH
The terminal should print a colon-separated chain of bin directory paths ending with /usr/local/git/bin.

The next package to install is 'cmake'. The installer will prompt us to provide a directory where to install the executables; the default is /usr/bin. This is a directory for commands that the operating system uses. To avoid mixing system commands with others, I chose /usr/local/bin according to the above conventions. Again we add /usr/local/bin to our PATH variable as suggested above. Then we create a folder for the driver application, change to this directory in the terminal in which we previously set the PATH variable, and follow Sean's further instructions.

Note our additions to the PATH variable pertain only to this terminal window and are lost when we close it. To make them permanent, we need to edit the PATH variable listed in the .bashrc file in our home directory. But this is not strictly necessary for our purpose here.

Sean instructs us to download the sources for two packages that we must compile ourselves, using git: OpenKinect and LibUSB.  The first depends on the latter. Hence, LibUSB must be patched for the use with Openkinect, built and installed first, using the OSX generic make command. Note that the package will install into the appropriate subdirectories of /usr/local.

In the next step, we build OpenKinect, more precisely libfreenect, with cmake. The compiler needs to be pointed to the header files that come with LibUSB. This is accomplished with providing /usr/local/include/usblib-1.0/ on the appropriate line in the cmake configuration gui opened using the ccmake command as Sean illustrates. After cmake has configured the build successfully, we compile the package using the make command.

In my configuration, the build also needed to have the path to libjpeg specified, in order to successfully complete its last stage known as linking. The compiler complaint reads:
Linking C executable as3-server
ld: library not found for -lJPEG

In OSX, this library is located in: /System/Library/Frameworks/ApplicationServices.framework/Versions/A/Frameworks/ImageIO.framework/Versions/A/Resources/. There must be ways to configure cmake with this path, probably by adding "-framework ApplicationServices -framework CoreFoundation" to the LDFLAGS variable. Proper configuration is crucial, if we wish to deploy our binaries to other systems. Because I was not planning to deploy the binaries, I decided to avoid re-configuration. Since the compiler always checks /usr/local/lib, I helped myself with providing a soft link in /usr/local/lib to the library's true location just so:
  • sudo ln -s /System/Library/Frameworks/ApplicationServices.framework/Versions/A/Frameworks/ImageIO.framework/Versions/A/Resources/libJPEG.dylib /usr/local/lib/libJPEG.dylib
With the repeat of the make step the build finished successfully and was ready to install.

Addenda
  • I just received the Kinect and have been running a test for close to one hour without fail (11/29/10).
Kinect on the Mac
  • The next step to more functionality entails hooking the kinect video stream up to an Actionscript3 flash server. The openkinect package provides help. Juan Carlos del Valle posted a video of the procedure to be followed with the title "Kinect now accessible from Flash" on the Freenect - Kinect projects site. The video moves along at a fast clip. I had to review the steps over and over again. Below I wrote out a step-by-step protocol of the procedure.

    Juan uses two Adobe Flash ActionScript files named test_depth.as and test_rgb.as which can be found in the libfreenect/actionscript directory. We need to download Adobe flex SDK_2.4 from the Adobe flex.org site to accomplish this. Once unzipped, we move the folder to our preferred location. The folder contains a bin-directory that is home to the mxmlc executable we need to use. Hence, it is helpful to add the path to this bin-directory to our PATH variable on the command line in the terminal window, as we added paths to bin-directories earlier. Then, we change into 'libfreenect/actionscript' directory using the cd command and type:

    • mxmlc test_depth.as

    With a little delay the terminal will respond:
    "Loading configuration file {your path}t/flex_sdk_4.1/frameworks/flex-config.xml
    {your path}/kinekt/libfreenect/actionscript/test_depth.as: Warning: This compilation unit did not have a factoryClass specified in Frame metadata to load the configured runtime shared libraries. To compile without runtime shared libraries either set the -static-link-runtime-shared-libraries option to true or remove the -runtime-shared-libraries option."

    Juan Carlos ignored the message. The command produces the file test_depth.swf in the same directory. We repeat the last step for test_rgb.as to generate test_rgb.swf.

    Next we need to start the Actionscript3 flash server. The subdirectory 'libfreenect/c/build/examples' containing the glview executable which generated the twin view in our earlier work is also home to the as3-server excecutable. Because I had not added this directory to my PATH variable, I changed into it and typed:

    • ./as3-server

    The terminal responded:
    Number of devices found: 1
    ### Wait depth client
    ### Wait rgb client
    ### Wait data client

    Opening test_rgb in my browser produced a live test image for color beginning with the comment:
    ### Got rgb client

    We kill the server with ctr C, and restart it with:
    • ./as3-server
    Then we opening test_depth.swf in our browser, producing a live image for depth beginning with the comment:
    ### Got depth client

    However, note that the red channel is not working. I am investigating (12/01/10).
  • The red channel works with as3-server built using a current libfreenect clone obtained with:
    • git clone git://github.com/imekinox/openkinect.git
    In order to prompt cmake to include as3-server in the build, we must first change the target option for as3-server in CMakeLists.txt to "ON" (12/07/10).
textbookx.com (Akademos, Inc.)