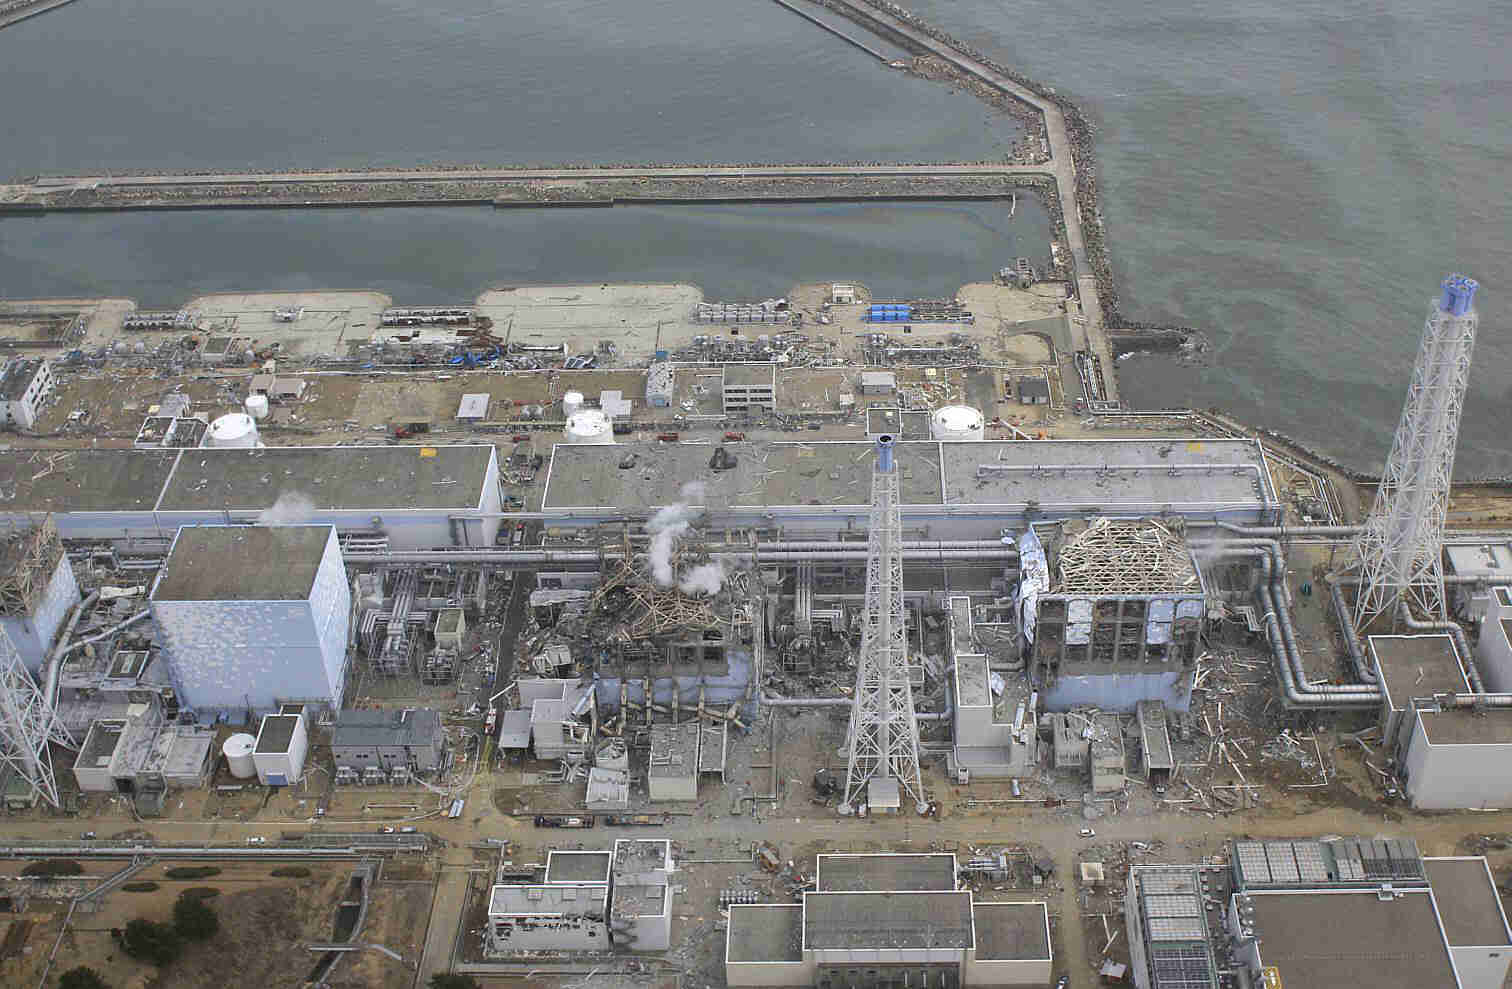
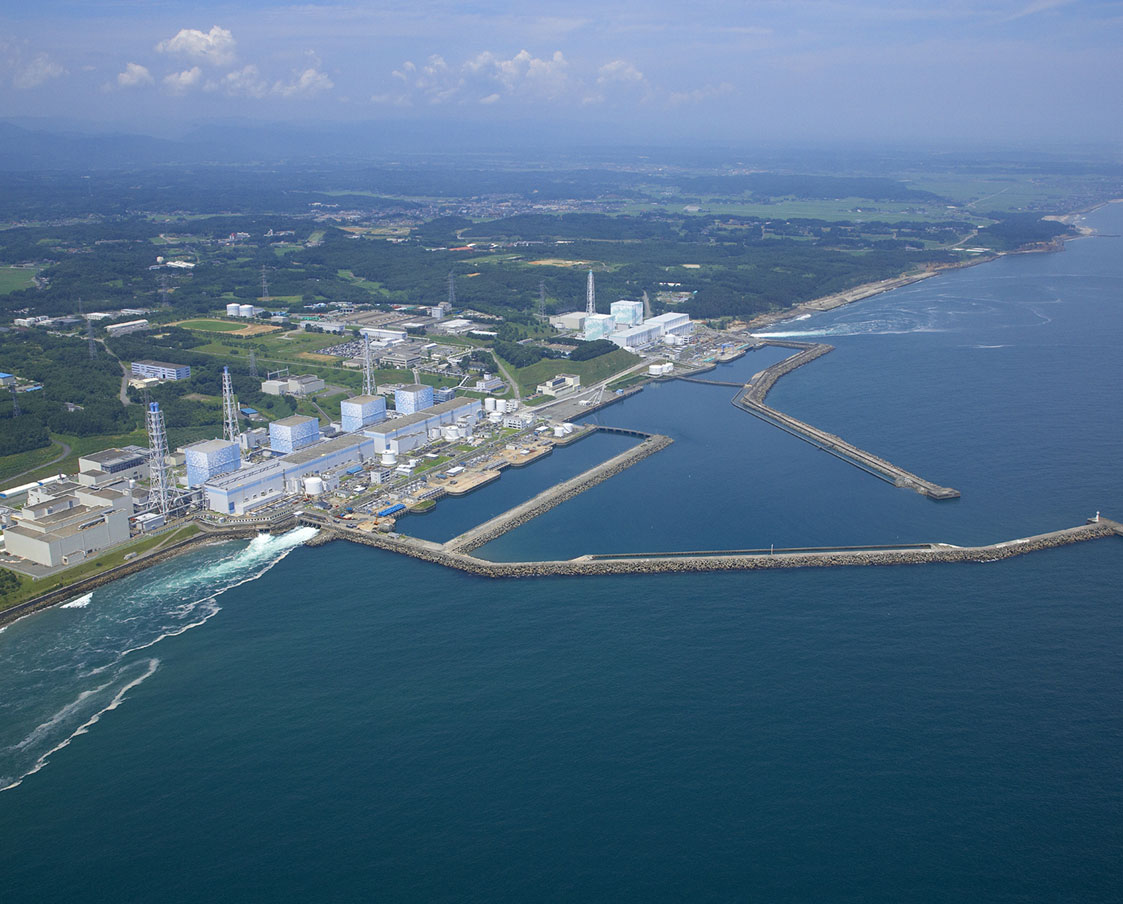
Bird's eye view of Fukushima Daiichi Nuclear Power Station before the earthquake and tsunami on Fri. Mar. 11, 2011. Units 1 (right) to 4 (left) are seen in the foreground and 5 (left) and 6 (right) further back. Units 1, 2 and 3 incurred fuel meltdowns (source: TEPCO).
Three of the six reactors at
Fukushima Daiichi Nuclear Power Station 120 miles north of Tokyo on Honshu's east coast incurred nuclear fuel meltdowns after the
2011 Tōhoku Earthquake and Tsunami. One reactor had been defueled for inspection. The station's two other reactors could be shutdown safely.
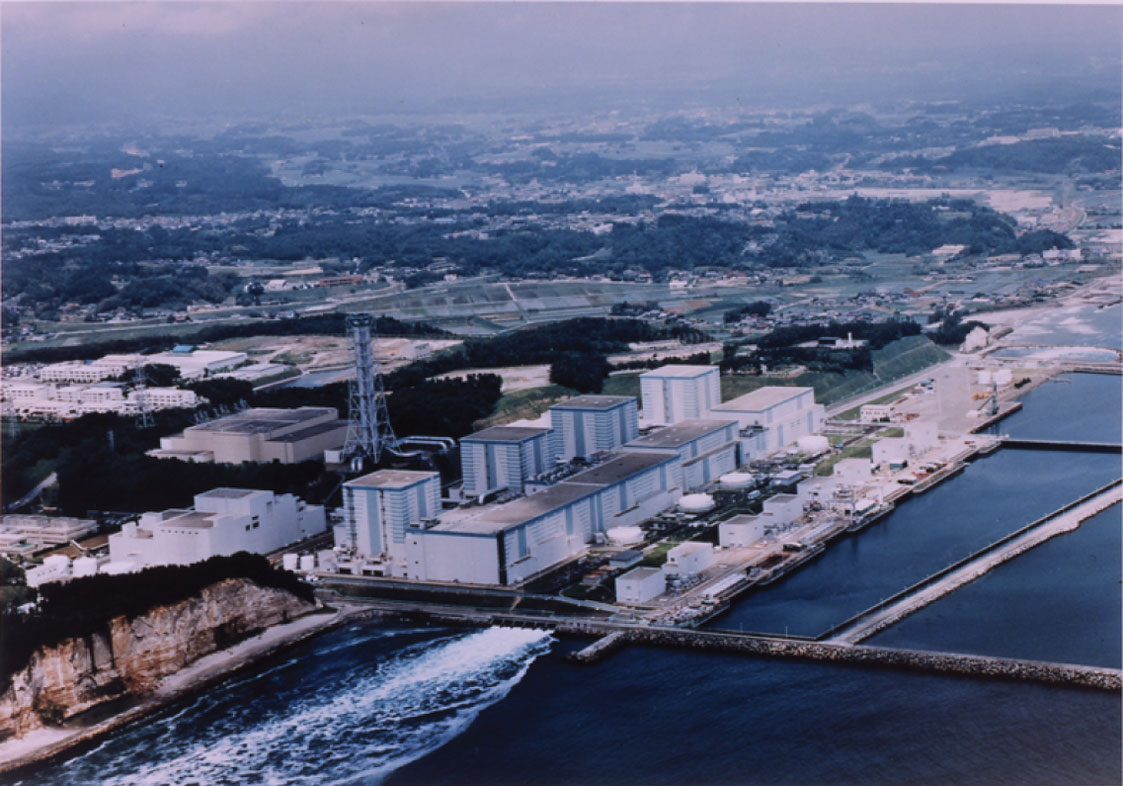
Bird's eye view of Fukushima Daini Nuclear Power Station before the earthquake and tsunami on Fri. Mar. 11, 2011 (unit 1 is on the right). All units could be safely shutdown. (source: TEPCO).
The four operating reactors at
Fukushima Daini Nuclear Power Station seven miles away could also be saved.
The meltdowns at Daiichi led to powerful hydrogen explosions, releasing amounts of radioactive material over land and sea only rivaled by the
1986 Chernobyl reactor disaster in the Ukraine. The government imposed an exclusion zone around the stricken station, because radiation doses were deemed too high for habitation. To date, roughly 70,000 former residents cannot return home permanently. According to Shigeru Sato, Tsuyoshi Inajima, Monami Yui and Emi Urabe's report with the title "
Japan Mulls Plan for One Operator to Run All Reactors: Energy" published by Bloomberg Oct. 22, 2013, cleanup and compensation are currently projected to cost 112 billion dollars, roughly equaling the cost for two
Hurricane Sandies.
A multitude of inquiries have attempted to uncover the causes underlying the Fukushima accident. The operator of both power stations,
Tokyo Electric Power Company, tells us what happened in its
accident reports. The company's fact compilation points to one essential lynchpin: the residual heat removal system must not fail.
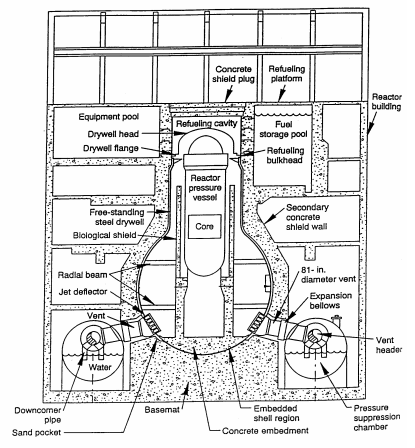
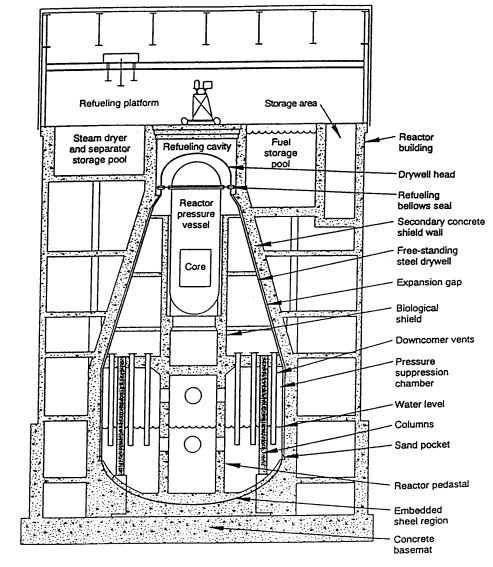
The reactors at Daiichi and Daini are boiling water reactors with General Electric's Mark I or Mark II primary containment systems.
 |
| Schematic of a boiling water reactor with a Mark I containment(source: IAEA). |
The Mark I containments consist of a pear-shaped drywell housing the reactor pressure vessel and a doughnut-shaped wetwell, also known as torus or pressure suppression chamber, holding a large pool of water. The drywell is connected at the bottom to the wetwell with equally spaced radial vent pipes.
 |
| Schematic of a boiling water reactor with a Mark II containment(source: IAEA). |
The Mark II containments are shaped differently, but still consist of a drywell with the reactor vessel and a wetwell with a pressure suppression pool.
When nuclear reactors need shutdown in an emergency, control and safety rods are inserted between the fuel rods in milliseconds, disrupting the nuclear chain reaction. Furthermore, the reactor pressure vessel's main steam lines may be isolated from the power-generating turbine and main condenser when potential damage to the pipes is anticipated. Without heat transfer, decay heat builds in the reactor pressure vessel, revving up pressure. Water must be injected into the vessel as coolant and to keep the fuel covered to prevent a meltdown.
Though emergency pumps can inject water into the vessel at high pressure, the pressure must be relieved to prevent damage to the vessel and to facilitate greater coolant injection. Safety relief valves are periodically opened to depressurize the vessel. The valves discharge high-pressure steam into the wetwell's pool, in which the steam is condensed and the pressure is absorbed. If the vessel was breached and high pressure steam bursted into the drywell, the pressure would be relieved into the suppression pool through the pipes that directly connect the drywell to the wetwell.
At Fukushima Daiichi Nuclear Power Station, the quake vibrations tripped the operating reactors automatically. Control and safety rods were inserted and the pressure vessels were isolated. Access to outside power was lost because of quake damage. Emergency diesel generators started up to provide power.
About 40 minutes later, tsunami waves flooded power distribution panels and emergency generators located low in the reactor turbine buildings. Battery banks continued to power emergency core cooling systems. Except for Unit 1 which is equipped with a isolation condenser, two reactor steam-driven pumps, the reactor core isolation cooling system and the high pressure coolant injection system, were available to inject water into the reactor pressure vessels, initially from storage tanks and later from the wetwell pools, while the operators attempted to depressurize the reactors, relieving steam into the pools.
- Eyewitness account of a Daiichi operator:
“We went into the field in order to open the vent valves. When we were at the near the torus (that is, the wetwell, ed.) room, we heard a large, weird popping sound. The valve is at up high, so I put my foot on the torus to lift myself up. Then, my black rubber boot was melted like butter [source: TEPCO interim report, Dec 2, 2011, page 53].”
- "The decomposition of the rubber-sulphur compound (that is, vulcanized rubber, ed.) takes place to an appreciable extent at the usual temperatures of vulcanization [source: Bureau of Standards Journal of Research, Volume 4 (1930), page 512]."
- "A typical vulcanization temperature for a passenger tire is 10 minutes at 170 °C [source: Vulcanization]."
However, once the pool temperature exceeds 100 °C, absorption of reactor pressure becomes progressively less effective. The steam-driven pumps sucking water from the pool stop working above that temperature. Therefore, removing heat from the wetwell pool is absolutely necessary.
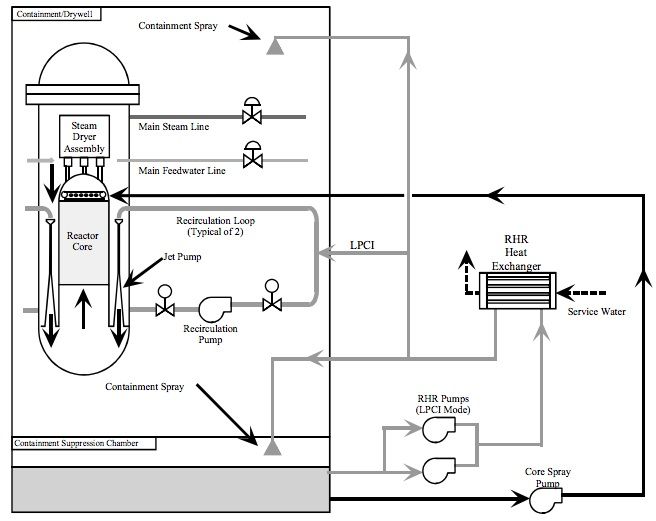 |
| Schematic showing the residual heat removal system on the right (source: NRC). |
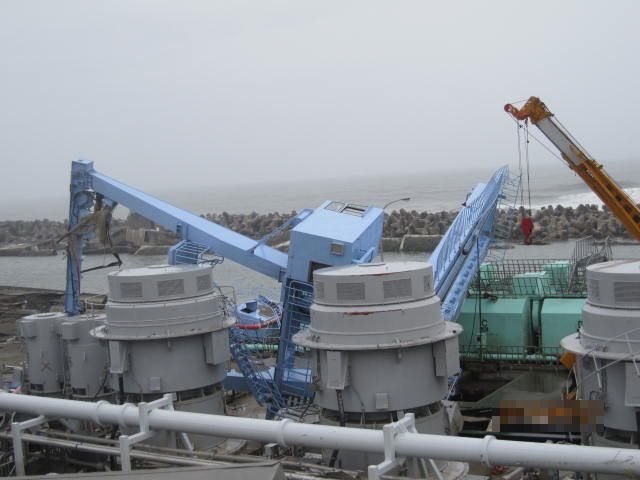
The residual heat removal system fulfills this function. It consists of electric motor-driven pumps that flush cold service water from a large body of water, known as ultimate heat sink, through heat exchangers, cooling the wetwell pool. In Fukushima, the ocean is the ultimate heat sink, and the seawater pumps of the residual heat removal system were built near the water’s edge 4 meters above sea level.
 |
| Exposed seawater pumps at Fukushima Daiichi Nuclear Power Station 2011 (source: Daisuke Tsuda). |
At Daiichi the pumps stood exposed on the dock and the tsunami rendered them irreparable, except one that could be re-powered and jury-rigged to supply units 5 and 6.
By contrast, at Daini the pumps were housed in buildings that can be seen dockside in the areal view above. The structures were not flood resistant, but withstood the brunt of the debris-laden waves. The pump for unit 3 persevered without loss of function, and the others could be repaired before the reactor fuel was uncovered. All reactors at both power stations with functioning residual heat removal systems could be shutdown safely within days.
Therefore, electric power must be available and the residual heat removal system must remain operable for nuclear reactors of the Fukushima type to successfully complete an emergency shutdown. These conditions impose a major constraint on accident recovery, representing a fundamental weakness of the reactor design. The residual heat removal system must remain operable under the conditions of flooding and station blackout.
Thirty reactors of this type currently operate in the United States. A number are sited in flood-prone areas. A moratorium should be imposed on these reactors, until the operators can ascertain that service water pumps are protected against inundation, debris, and loss of power.
Related Posts